Configuring Redis with Golang API Server — System Design for Developers
I have been writing API servers in Go for a long time, and boosting performance has been one of my primary goals. Fortunately, databases like Redis make it easy to do so, and in this article, I will walk you through using Redis to boost API performance.
Particularly, I would be caching API keys the user sends, which I usually authenticate with Firebase as my primary database for storing user-related information. Despite the ease of storing user-related data, databases like Firebase have low I/O speeds and take response times in the order of 100s of milliseconds. If your API server requires API Keys to authenticate and is called frequently by the user, caching can help to improve the API server’s performance by a magnitude of 100 times.
I would use a Golang-based REST API server, which uses Firebase for authentication and serves news data to fronted applications. The user is required to send an HTTP Header X-API-Key: to fetch the data. The valid API keys are stored in Firebase with mechanisms that are out of scope for this article.
What is the Redis Database and Concept Caching?
Caching temporarily stores data in a database with high I/O performance (typically less storage capacity, data organization capabilities, and features) if your primary database has a slower I/O performance (but better authentication features and storage capabilities).
Caching is applied when data is accessed frequently, and the data source has a significant overhead compared to what it needs to be. Once pulled from the primary source, the data can be stored in a faster database and used multiple times.
In this case, Firebase is a feature-rich database, but improvements can be made on the I/O side. This performance latency is not the issue with Firebase’s design but due to its nature of spending resources on other important features.
Redis is an in-memory, single-threaded, key-value pair database. In-memory databases store data in RAMs with faster I/O speed (lower space) than disk-based databases (huge space). You can store data in a key-value format, for example api-key: .
To learn more, visit Redis Official Website.
Drawing the Architecture
This is the most basic way of authenticating a user for an API server.
- Query the Firebase server to check if the API Key is correct
- Wait for time T (magnitude of 100 milliseconds)
- Get the Response and take action based on the response

Here is the updated diagram after caching:
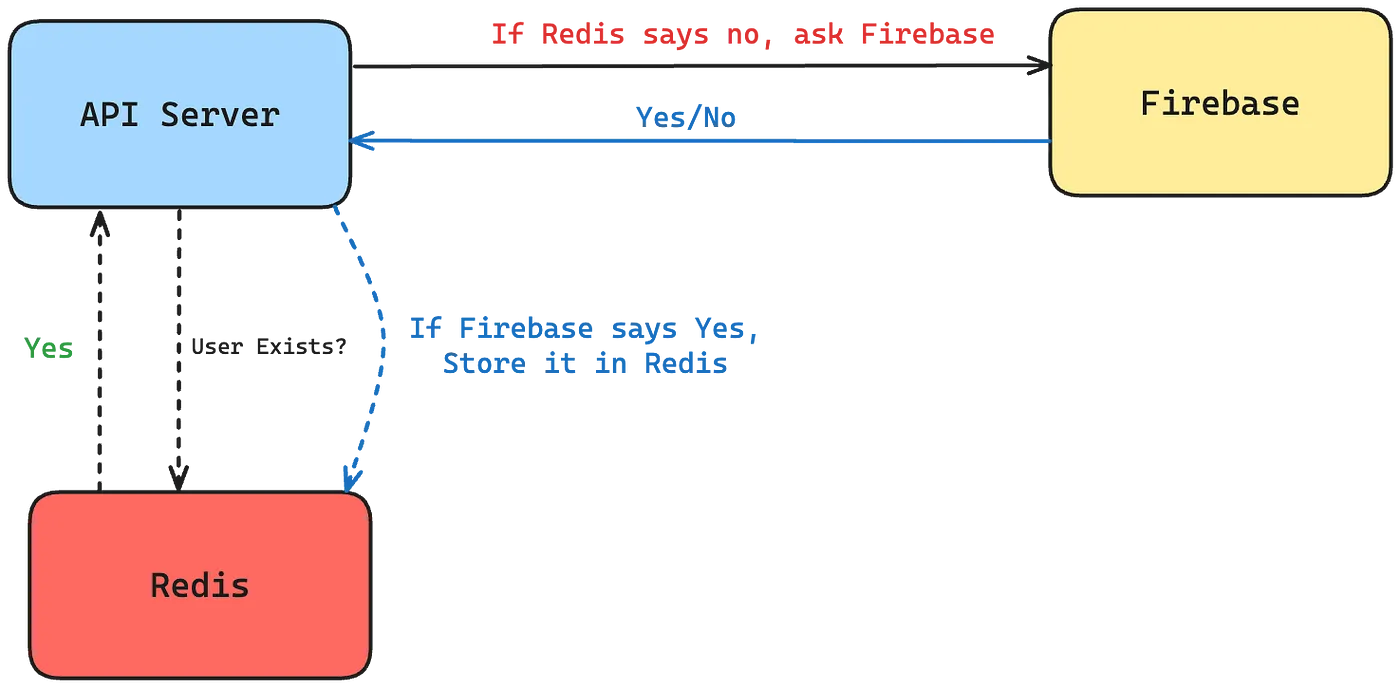
Here is what happens:
- Ask Redis if the User Exists.
- Wait for time T (magnitude of 1 milliseconds or even 100 microseconds)
- If Yes, authorize the user
- If no, Ask Firebase
- Wait for time T (magnitude of 100 milliseconds)
- If Yes, authorize the user
- Store User Auth in Redis
So when the request is made for the first time, it takes 100s of milliseconds to process the request. But the next time, it’s in the order of 1s of milliseconds or even microseconds if the Redis server is close to the API server.
Issues with Caching and How to Tackle Them
Caching has its advantages but has some serious problems that must be solved.
If the API Key on Firebase is removed for any reason, for example, it expires or is banned from using the service, your API Server might not recognize the update and validate users based on the data stored in Redis. This is called “stale data”. In that case, this causes the issue of inconsistency.
Hence, you must keep the Redis database in sync with your primary one. Updating Redis every time something happens might not be feasible, cause additional overheads to the database, and potentially slow down Redis due to too many frequent writes.
In this example, we set up TTL (time to live) for each key in Redis. After a certain interval, Redis deletes the key, clears the cache, and updates it when the next request is made. This should be done depending on your applications. In my case, I will keep it for 10 mins. A formal term for this method is called “flushing.”
Advanced methods like event-based updates can be used, which I will explain in my upcoming articles.
Jumping onto the Code
Here is what the REST API Server built with Golang and the standard library net/http:
package main

import (
 "context"
 "fmt"
 "net/http"

 "firebase.google.com/go/v4"
 "firebase.google.com/go/v4/auth"
 "google.golang.org/api/option"
)

var firebaseAuth *auth.Client

func init() {
 // Initialize Firebase Auth
 opt := option.WithCredentialsFile("path-to-your-firebase-service-account.json")
 app, err := firebase.NewApp(context.Background(), nil, opt)
 if err != nil {
  panic(fmt.Sprintf("Failed to initialize Firebase App: %v", err))
 }

 firebaseAuth, err = app.Auth(context.Background())
 if err != nil {
  panic(fmt.Sprintf("Failed to initialize Firebase Auth: %v", err))
 }
}

func main() {
 setupRoutes()

 port := ":8080"
 fmt.Printf("Starting server on port %s \n", port)
 err := http.ListenAndServe(port, nil)
 if err != nil {
  fmt.Printf("Could not start server: %s \n", err)
 }
}

// Setting up API endpoints
func setupRoutes() {
 versionPrefix := "/api/v1"
 http.HandleFunc(versionPrefix+"/ping", requestMiddleware(ping))
 http.HandleFunc("/", FallbackHandler)
}

// Middleware to authenticate requests
func requestMiddleware(next http.HandlerFunc) http.HandlerFunc {
 return func(w http.ResponseWriter, r *http.Request) {
  apiKey := r.Header.Get("X-API-Key")
  if apiKey == "" {
   http.Error(w, "Missing API Key", http.StatusUnauthorized)
   return
  }

  // Verify API Key with Firebase
  token, err := firebaseAuth.VerifyIDToken(context.Background(), apiKey)
  if err != nil {
   http.Error(w, "Invalid or Unauthorized API Key", http.StatusUnauthorized)
   return
  }

  next(w, r)
 }
}

// Ping handler
func ping(w http.ResponseWriter, r *http.Request) {
 w.WriteHeader(http.StatusOK)
 _, _ = w.Write([]byte("pong"))
}

// Fallback Handler
func FallbackHandler(w http.ResponseWriter, r *http.Request) {
 http.Error(w, "Invalid Endpoint", http.StatusNotFound)
}
It works as explained in the diagram above with no caching.
Here is the code for caching API keys with Redis:
package main

import (
 "context"
 "fmt"
 "net/http"
 "time"

 "github.com/go-redis/redis/v8"
 "firebase.google.com/go/v4"
 "firebase.google.com/go/v4/auth"
 "google.golang.org/api/option"
)

var (
 firebaseAuth *auth.Client
 redisClient  *redis.Client
)

func init() {
 // Initialize Firebase Auth
 opt := option.WithCredentialsFile("path-to-your-firebase-service-account.json")
 app, err := firebase.NewApp(context.Background(), nil, opt)
 if err != nil {
  panic(fmt.Sprintf("Failed to initialize Firebase App: %v", err))
 }

 firebaseAuth, err = app.Auth(context.Background())
 if err != nil {
  panic(fmt.Sprintf("Failed to initialize Firebase Auth: %v", err))
 }

 // Initialize Redis Client
 redisClient = redis.NewClient(&redis.Options{
  Addr:     "localhost:6379", // Adjust the address as needed
  Password: "",               // No password by default
  DB:       0,                 // Use default DB
 })

 _, err = redisClient.Ping(context.Background()).Result()
 if err != nil {
  panic(fmt.Sprintf("Failed to connect to Redis: %v", err))
 }
}

func main() {
 setupRoutes()

 port := ":8080"
 fmt.Printf("Starting server on port %s \n", port)
 err := http.ListenAndServe(port, nil)
 if err != nil {
  fmt.Printf("Could not start server: %s \n", err)
 }
}

// Setting up API endpoints
func setupRoutes() {
 versionPrefix := "/api/v1"
 http.HandleFunc(versionPrefix+"/ping", requestMiddleware(ping))
 http.HandleFunc("/", FallbackHandler)
}

// Middleware to authenticate requests
func requestMiddleware(next http.HandlerFunc) http.HandlerFunc {
 return func(w http.ResponseWriter, r *http.Request) {
  apiKey := r.Header.Get("X-API-Key")
  if apiKey == "" {
   http.Error(w, "Missing API Key", http.StatusUnauthorized)
   return
  }

  // Check cache in Redis for the API key
  ctx := context.Background()
  cachedToken, err := redisClient.Get(ctx, apiKey).Result()
  if err == redis.Nil {
   // Key not found in cache, verify with Firebase
   token, err := firebaseAuth.VerifyIDToken(ctx, apiKey)
   if err != nil {
    http.Error(w, "Invalid or Unauthorized API Key", http.StatusUnauthorized)
    return
   }

   // Cache the token UID with a TTL of 10 minutes
   err = redisClient.Set(ctx, apiKey, token.UID, 10*time.Minute).Err()
   if err != nil {
    http.Error(w, "Failed to cache token", http.StatusInternalServerError)
    return
   }

   fmt.Printf("Authenticated User ID (from Firebase): %s\n", token.UID)
  } else if err != nil {
   http.Error(w, "Redis error", http.StatusInternalServerError)
   return
  } else {
   // Cache hit, log the cached user ID
   fmt.Printf("Authenticated User ID (from Redis): %s\n", cachedToken)
  }

  // Proceed to the next handler
  next(w, r)
 }
}

// Ping handler
func ping(w http.ResponseWriter, r *http.Request) {
 w.WriteHeader(http.StatusOK)
 _, _ = w.Write([]byte("pong"))
}

// Fallback Handler
func FallbackHandler(w http.ResponseWriter, r *http.Request) {
 http.Error(w, "Invalid Endpoint", http.StatusNotFound)
}
After including Redis in the tech stack, you now have a performance boost in orders of magnitude.
Conclusion
I have been utilizing the power of caching in my projects, fastening the API responses and improving user experiences. While working with data-intensive APIs, cutting the time required to process the request is as important as optimizing the data processing itself.
Achieving user authentication in a few milliseconds is a leap in your API server’s performance. As a general rule of thumb, I consider my APIs to respond in less than 300 milliseconds when interacting with features of my front end (this doesn’t apply to high levels of processing like using AI models or tedious computations). Cutting time in processing the request gives me more time to process the data and send it to the user.
In the upcoming blogs, I will focus on more content-based system design for developers and help you optimize your backend services from the perspective of infrastructure and code.
Follow me and stay tuned to learn more about such concepts!